
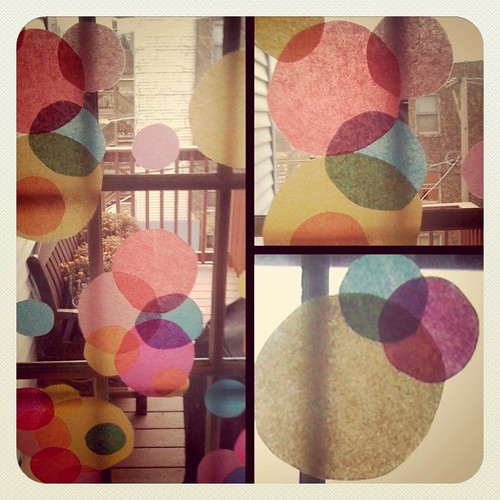
Though the temperature has been unseasonably warm over the past few days (melting the snow - hooray!) the skies have not exactly been sunny and blue. A pretty day here or there, but otherwise it's gray skies all the way. A few weeks ago I posted about making an ice bunting, and I was amazed at what a difference it made! I hung it out our back window - a window I look through dozens of times a day since it's located at the back of our one main hallway (in which Ella-Bean likes to play!!) Once the bunting melted it was back to the same, boring gray-and-brown I was sadly getting used to...it was time to bring some color back into our window this week! Feeling a creative impulse, I decided to use what I had on hand. Now our window make me smile every one of the million times I see it each day!!

This easy project took about 15 minutes, but may take you longer or shorter depending on your window size, complexity, and whether or not you have a little one "helping."
Supplies:
- tissue paper
- water
- Elmer's glue
- paintbrush
- scissors

To-do:
The tissue paper can be from packages you've received or from the store. Plan out what colors and shape you'd like and cut out your pieces. Also keep in mind what they will look like when layered! Mix a bit of glue in with your water - now I just poured some in and didn't measure, but I'd estimate the ratio is 1 part glue to 4 parts water.

Now the easy and fun part - just use the water mix to "paint" your paper onto the window.

They will take on a pretty semi-translucent look and dry in about 10 minutes. Once dry, just take a wet rag and clean up your edges, and voila! you're done!! You can leave your new design up for as long as you would like...and when you are done, just use a warm, wet rag to clean it all off.

The beauty of this project is that you can make it as sophisticated as you want. I think this would be lovely in a bathroom window, using small dots and only white paper. This could also be brilliant in a child's room with colorful balloons floating up to the sky (ooooh, I may try that one!!) You can also get all your supplies ready and have your kiddo work on this project (I'd say ages 4 and up, but hey, my kiddo is only 1, so you be the judge). Really, for this project the sky and your imagination (oh, and your window size) is the limit!!
P.S. If you do beautify one (or more) of your own windows, please share - I'd love to see what you come up with!
2 comments:
I wonder - if you mix a little bit, as in a teaspoon of Windex, or dish soap to the "paint" solution - it may not only make window cleaning easier, but may be the first step to your spring cleaning window washing. Whew...THAT was a run on sentence.
:)
You totally decoupaged your windows. Awesome idea. Might be just the thing to spruce up our drab and dreary dining room.
Post a Comment